5 tips for designing your nursery
By Selena Reif, professional interior designer and founder of FLEURISH
When I was pregnant with my first baby, I had the overwhelming urge to nest the entire nine months. As I got things ready for babe, part of my nesting tendencies manifested in me wanting to create the world’s cutest nursery. I went straight to Pinterest to look for all the baby room decorating tips I could find, saved all my favorite inspiration, and got to work. And while I had done a fair amount of research before undertaking the design, I still had things I wished I had known or would have changed looking back.
Since then, I’ve started my own interior design firm and designed, decorated, and styled tons of sweet rooms for tiny people. I’m sharing all of my nursery decorating tips I’ve learned over the years with you as well as our process for designing any room, and hopefully making your journey a little bit easier!
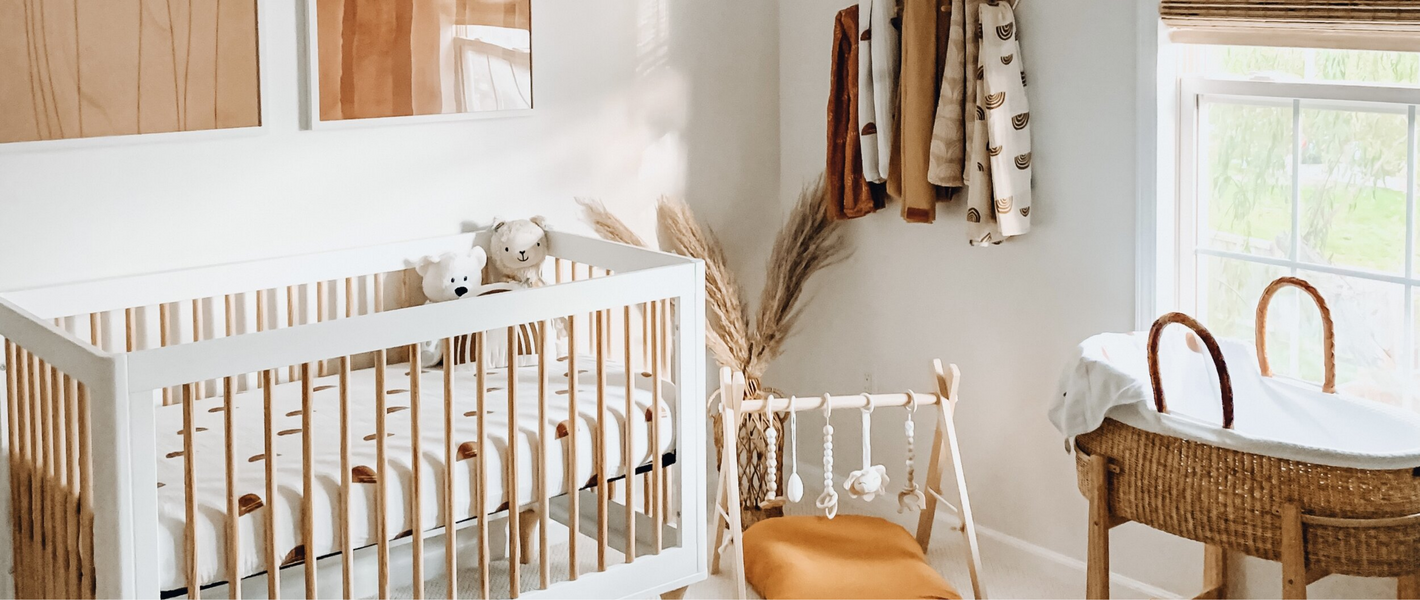
When starting at the very beginning, the most important thing to do is to find out what you are drawn to. Spend some time on Pinterest gathering ideas of designs you like. Like, a lot of time. The more the better. Go down the rabbit hole. It’s fun down there. Are you drawn to neutrals like in this boho space? Do you love soft and girly?


They don’t even need to all be nursery design ideas, you can take inspiration from anywhere, as long as it speaks to you. Check out this image for example... I love interesting wall textures and could definitely see doing an accent wall like this in a nursery.
Now that you’ve pinned tons of images of baby room design ideas and beyond, it’s time to see what the common thread is that pulls these images together. Do they all have plants? Do they all have wallpaper? This will guide you towards narrowing the design elements down and might even lead you to a theme.
*Quick note on nursery design themes: you don’t need to have one. Yes, you heard that right, and I will repeat it. You do not need a theme to have a cohesive nursery design. You do, however, need a design direction, and that is exactly what your Pinterest board is for.
Another note on themes. If you are indeed going to go with a theme for your nursery design, consider making it something that is easy to change out over time. For example, if you are doing a car/truck themed nursery, maybe you want to use these cute dresser knobs and some printable framed art on the walls rather than investing in truck wallpaper and a car crib.
You’re going to want this room to grow with baby (more on that in a bit), and it’s shocking the rate at which kids change what they’re into. So make it easy on yourself and don’t glue the theme-specific décor to the walls.


Consider the fact that the nursery is in your house. Your house, not your baby’s house. And yes, you want to design something your baby will love, but you will be spending a lot of time in there, so design something you love too. There’s something really timeless about nurseries that look like you could swap out the crib for a bed and it just turns into a guest bedroom. And you can always add layers of more baby-ish décor on top of the rest of the design to keep it feeling like it is meant for your little one. Check out this nursery that did just that.
This is also really beneficial when your baby does grow into a toddler, and even beyond. Sticking with more neutral design elements for the walls gives you a better chance that there’s less to change as they get older. When your baby is ready for a toddler bed and no longer needs that changing table, you could swap the bed for a bigger one, change out the changing table for a play table, and viola, your room is growing with your baby. Here’s an example of a pretty rainbow mural in a nursery that can easily be used in a big girl room, too.
tip #3: Think about the layout of your individual room
It’s so easy to see an image you love on Pinterest and get fixated on that one image, stopping at nothing until you have created that exact same vignette in your nursery. Remember that the images you are loving and saving are two dimensional images of a three dimensional space, and you aren’t seeing the whole picture. The most important thing to consider is your real-life space and what will make it most functional for you. Some things to consider:

1. Crib placement
There are so many options here. Maybe you have a huge nursery and can put your crib in the middle of the room. Pictures like this certainly are gorgeous, just keep in mind that you are likely going to need a few other pieces of furniture in the room as well, like a rocking chair, dresser, changing table, etc., and you will need room to walk around the crib and still effectively use those other pieces of furniture. If you can pull this off, go for it!

2. Smaller spaces
Maybe you have a room on the smaller side, or you are having baby share a room with you or a sibling, and the most effective placement is actually in the closet to save on space. This can be done in a very cute way, and most pictures of cribs on the wall in the room can easily be replicated in a little nook in the closet. Moral of the story here: stay open and creative. If you see something you really love, play with the ideas of that picture to make it work for you.

3. changing table options
Something else to keep in mind when looking at layouts for your nursery is that you have options for your changing table. More traditionally, changing tables have been on top of the dresser or similarly sideways and against the wall. When I was designing my first baby’s nursery, I really didn’t like the idea of having to stand sideways and twist while also trying to wrangle wiggly legs and control possible leaks/sprays/spills.
I wanted a corner changing table so I could stand forward and face my baby for diaper changes, and I had the hardest time finding a corner changing table (I think I found 2 options)! Now that it’s been a few years since that first nursery design, corner changing tables are becoming a lot more popular and there are many more adorable options for them.
*A quick note on changing tables: a lot of times in photographs you will see mobiles above a crib, but the crib is where you want baby to sleep, not to be distracted. Before I designed the nursery for my first baby, someone told me to put the mobile above the changing table. That way they have something fun to look at during diaper changes, and even distract them from the task at hand. It was the greatest thing ever.
When thinking about the layout and all the different options, the best thing to do here is to measure your room, and then draw it out to look at different possibilities. You have a lot of choices when it comes to shapes and sizes of furniture for your nursery, and then infinite more when you layer that with the placement of those pieces. My advice here is to get creative and have fun with it, and think about what makes the most sense for you and how you are planning to use the space.
Tip #4: Consider the function of the room
This tip is less about the cute fun things to incorporate into your baby room design, and more about making sure you’ve thought through the way you are going to use the room.


While we’re on the topic of snacks, we’ve also had clients request a mini fridge by the rocker (or if that doesn’t fit in the design, at least a basket) to hold midnight snacks for long stays in the rocking chair. I didn’t have this in my nurseries but had I thought of it before, you better believe I would have designed in a snack spot for myself!
This is where it starts to get fun and you bring your design to life! When we are designing a room, we use Pinterest to collect all of the items we love. If we are designing a nursery, we’ll pin a few cribs, a few dressers, a few rocking chairs, you get the idea. Here’s a big design helper: did you know you can easily drag and rearrange pins within your board? We drag the options around and group things that look good together until we find a perfect harmony between all of the different pieces of furniture we need. This helps us create our shopping list and visualize the items together before clicking purchase. You can also use keynote or photoshop to pull the images of different items together to get that visual mood board.
*Quick tip: don’t forget to put some of these pieces on your registry if you are making one! You might be surprised at what some of your friends and family want to purchase for you. You can even add things to your registry like wallpaper installation or help painting baby’s room.


I hope some of this insight into our process and my baby room decorating tips were helpful! Remember: start with the inspiration and the vision, and then narrow it down to what works for you. Both the style and the layout needs to work for your individual space. Design for longevity so that the room can grow and change with your baby as your baby grows. Think about how you need the room to function and add in pieces to help support that. Then don’t be afraid to ask for help from friends and family when it comes to purchasing and putting the nursery design together.
Lastly and maybe most importantly, remember that the images you see on Pinterest are usually highly styled and curated images from professionally designed nurseries. Let’s pause for a reality check for a moment. Even when we are styling a room for a photoshoot, there is always something (read: many things) that needs to be moved to get “the shot.” Your room will be sweet and lovely and perfect, but it won’t be spotless and look exactly like the images you see on Pinterest all the time. Make sure the room makes you feel happy, and at the end of the day that is all that matters.
Selena Reif is one half of FLEURISH, a San Diego-based interior design firm specializing in real estate, design, the whole enchilada. She started renovating homes with her not-yet-husband over 15 years ago, then started a staging company on the side. After slowing down to start her family, she met Erin Anderson (the other half of the design duo). They quickly realized their shared love for design and FLEURISH was born. On any given day you’ll find Selena chasing her young boys around the beach, designing any and everything she can get her hands on (including designing and redesigning her family’s Carlsbad home), taking a yoga or dance class (helloooooo cardio hip hop), and enjoying the San Diego sunshine…in other words…FLEURISHing.


Photo credit: Luna Rose Essentials || Inspired By This || Savvy Heart || Creatables Shop || Little Folks Printables || The Jess Style || FLEURISH || Project Nursery || Pregnant Chicken || Ellie & Becks || Hide Studio || FLEURISH || FLEURISH